Introduction To Rendering
First things first
You cannot use legacy OpenGL rendering on modern versions of Minecraft anymore. Doing so will crash the game, due to the context not being set properly. Instead, all versions beyond (and including) 1.17 use BufferBuilders, which format rendering data for themselves and upload it to OpenGL to draw.
This means that you must use the rendering system Minecraft already provides, or implement your own phone line to GL.glDrawElements().
Basic Rendering
We're going to go slow at first, let's start on the HUD. Since there are no transformations to be done, this should be easy. Right? Right?
Fabric API is needed for this example.
Let's start by making an event listener:
@Override
public void onInitializeClient() {
    HudRenderCallback.EVENT.register((drawContext, tickDelta) -> {
        // See below
    });
}
This will just make a new event listener for the HudRender event, nothing special just yet.
It gets interesting when we actually make use of the rendering API:
1. The Tessellator
The tessellator manages the main BufferBuilder of the game. It's used everywhere, where content is drawn. To get the tessellator, you can call Tessellator.getInstance(): Tessellator tessellator = Tessellator.getInstance();
2. The BufferBuilder
The buffer builder holds all the important data we need for rendering. Luckily for us, the Tessellator already has a BufferBuilder, so let's use it: BufferBuilder buffer = tessellator.getBuffer();
3. Initializing the buffer
Once we have the buffer, we obviously want to draw something to it. This is where we call buffer.begin(VertexFormat.DrawMode, VertexFormat). The DrawMode specifies how many vertecies we want to have per face, and how they get drawn by OpenGL:
DrawMode.LINES: 2 vertecies per element, connected by a single line.DrawMode.LINE_STRIP: 2 vertecies for the first element, 1 vertecie for additional ones, all vertecies are connected by one, continuous line.DrawMode.DEBUG_LINES: 2 vertecies per element, connected by a single line, which is always exactly one pixel wide on the screenDrawMode.DEBUG_LINE_STRIP: SeeDrawMode.LINE_STRIPDrawMode.TRIANGLES: 3 vertecies per element, a regular "nacho" tri.DrawMode.TRIANGLE_STRIP: at least 3 vertecies, a "strip" of vertecies. A bit hard to explain, we'll see an example of this one laterDrawMode.TRIANGLE_FAN: at least 3 vertecies, draws the convex hull of the given vertecies.DrawMode.QUADS: 4 vertecies per element, a regular quad.
The VertexFormat specifies which elements we specify in our data buffer, and how they should be sent to OpenGL:
VertexFormats.BLIT_SCREEN: Position (3 floats), UV (2 floats), Color (4 ubytes)POSITION_COLOR_TEXTURE_LIGHT_NORMAL: Position, Color, Texture UV, Texture Light (2 shorts), Texture Normal (3 sbytes)POSITION_COLOR_TEXTURE_OVERLAY_LIGHT_NORMAL: Position, Color, Texture UV, Overlay (2 shorts), Texture Light, Normal (3 sbytes)POSITION_TEXTURE_COLOR_LIGHT: Position, Texture UV, Color, Texture LightPOSITION: Just a PositionPOSITION_COLOR: Position, a solid ColorLINES: Position, Color, NormalPOSITION_COLOR_LIGHT: Position, Color, LightPOSITION_TEXTURE: Position, UVPOSITION_COLOR_TEXTURE: Position, Color, UVPOSITION_TEXTURE_COLOR: Position, UV, ColorPOSITION_COLOR_TEXTURE_LIGHT: Position, Color, UV, LightPOSITION_TEXTURE_LIGHT_COLOR: Position, UV, Light, ColorPOSITION_TEXTURE_COLOR_NORMAL: Position, UV, Color, Normal
This example uses the draw mode QUADS and vertex format POSITION_COLOR_TEXTURE, to draw a simple square texture onto the screen: buffer.begin(VertexFormat.DrawMode.QUADS, VertexFormats.POSITION_COLOR_TEXTURE);
4. Actually drawing to the buffer
We can build up the buffer vertex by vertex. To do this, we just call buffer.vertex(matrix, float, float, float), the matrix being the transformation matrix (we'll see this one later), and the 3 floats being the position on the hud in (x, y, z) coordinates.
This returns a vertex builder, which we can use to specify additional information. It's important to follow our defined VertexFormat in order, else opengl may not entirely understand what we want to do. After building the vertex, we call .next() to finish and move on to the next vertex.
It's also recommended to know what culling is, since faces might not render if ordered incorrectly.
4.1. The transformation matrix
INFO
This is a brief TLDR on the MatrixStack classes. For more information, see the Matrices page.
A transformation matrix is just transforming the coordinates we give into the vertex call. The transformations can scale our model, move it around and rotate it. To obtain the current transformation matrix, you can call drawContext.getMatrices().peek().getPositionMatrix(): Matrix4f positionMatrix = drawContext.getMatrices().peek().getPositionMatrix();
4.2: Actually drawing
We'll just make 4 vertecies at (20, 20), (20, 60), (60, 60) and (60, 20) to specify the corners of our image, then specify the color of that specific vertex, followed by the correct UV coordinates for the texture we want to draw:
buffer.vertex(positionMatrix, 20, 20, 0).color(1f, 1f, 1f, 1f).texture(0f, 0f).next();
buffer.vertex(positionMatrix, 20, 60, 0).color(1f, 0f, 0f, 1f).texture(0f, 1f).next();
buffer.vertex(positionMatrix, 60, 60, 0).color(0f, 1f, 0f, 1f).texture(1f, 1f).next();
buffer.vertex(positionMatrix, 60, 20, 0).color(0f, 0f, 1f, 1f).texture(1f, 0f).next();
The UV coordinates specify the position of the image at that vertex, (0, 0) means the top left corner, (1, 1) the bottom right, (1, 0) the top right corner, etc. Changing these coordinates at random might distort the image.
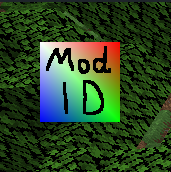
The color we set in .color changes as well, changing the texture color inbetween vertecies. This results in a fun color shift effect we'll observe later. To disable that effect, you can set all of the colors to 1f (max).
5. Finishing
After drawing the vertecies, we need to actually draw them to the screen. This is where tessellator.draw() comes in: It ends the buffer, draws it to the screen and prepares everything to be used again.
This is the point where we need to actually define a texture to draw, and prepare the GL flags. For this example, we want to draw the "icon.png" texture, so we'll point the renderer at our icon.png image, using RenderSystem.setShaderTexture: RenderSystem.setShaderTexture(0, new Identifier("examplemod", "icon.png"))
The 0 in setShaderTexture specifies the main texture of the drawing shader (more to that later). There are other textures you can use, but they might not do what you expect them to.
The identifier just points to our icon.png texture. For it to work properly though, you need to install the fabric-resource-loader fabric api component, if it isn't already installed by default.
We also need to set the drawing shader, that actually renders our contents. We can use RenderSystem.setShader for this. The shader can be obtained from GameRenderer, and usually has the same name as the VertexFormat specified earlier: RenderSystem.setShader(GameRenderer::getPositionColorTexProgram)
It's also recommended to clear the preset color, else your rendered content might look slightly tinted: RenderSystem.setShaderColor(1f, 1f, 1f, 1f)
After all of this, we finally call tessellator.draw().
Finished Example
HudRenderCallback.EVENT.register((drawContext, tickDelta) -> {
    Matrix4f positionMatrix = drawContext.getMatrices().peek().getPositionMatrix();
    Tessellator tessellator = Tessellator.getInstance();
    BufferBuilder buffer = tessellator.getBuffer();

    buffer.begin(VertexFormat.DrawMode.QUADS, VertexFormats.POSITION_COLOR_TEXTURE);
    buffer.vertex(positionMatrix, 20, 20, 0).color(1f, 1f, 1f, 1f).texture(0f, 0f).next();
    buffer.vertex(positionMatrix, 20, 60, 0).color(1f, 0f, 0f, 1f).texture(0f, 1f).next();
    buffer.vertex(positionMatrix, 60, 60, 0).color(0f, 1f, 0f, 1f).texture(1f, 1f).next();
    buffer.vertex(positionMatrix, 60, 20, 0).color(0f, 0f, 1f, 1f).texture(1f, 0f).next();

    RenderSystem.setShader(GameRenderer::getPositionColorTexProgram);
    RenderSystem.setShaderTexture(0, new Identifier("examplemod", "icon.png"));
    RenderSystem.setShaderColor(1f, 1f, 1f, 1f);

    tessellator.draw();
});
Rendered content
INFO
Changing the color of the texture will multiply the actual pixel color with the tint color, which is why the black text is still black in this image, and the white background is entirely tinted